Stable Diffusion 1.5 with private volume
In the quickstart, you created a simple application. In this example, we use a private volume to store the Stable Diffusion 1.5 model files and implement an AIGC(AI generated content) online text-to-image and image-to-image service.
Login EVERAI CLI
Create a directory for your app firstly. In your app directory, you should login by token you got in EverAI.
everai login --token <your token>
Create secrets
This step is optional, if you have already created a secret for the registry you need to access, or if your registry is publicly accessible.
In this case, we will create one secret for quay.io.
everai secret create your-quay-io-secret-name \
  --from-literal username=<your username> \
  --from-literal password=<your password>
NOTE
quay.io is a well-known public image registry. Well-known image registry similar to quay.io include Docker Hub, GitHub Container Registry, Google Container Registry, etc.
You should create a secret to access Hugging Face as well.
everai secret create your-huggingface-secret-name \
  --from-literal token-key-as-your-wish=<your huggingface token>
Create configmap
Optional, but you can use configmap for adjust autoscaling policy after deploying the image.
everai configmap create sd15-configmap \
  --from-literal min_workers=1 \
  --from-literal max_workers=5 \
  --from-literal min_free_workers=1 \
  --from-literal scale_up_step=1 \
  --from-literal max_idle_time=60
Write your app code in python
Basic setup
There is an example code in app.py.
First, import the required EverAI Python class library. Then define the variable names that need to be used, including the volume, the secret that accesses the image registry, and the file stored in the volume. Use the Image.from_registry static method to create a image instance. Create and define an app instance through the App class.
What needs to be noted here is that you need to configure GPU resources for your application. The GPU model configured here is "A100 40G", and the number of GPU cards is 1.
from everai.app import App, context, VolumeRequest
from everai_autoscaler.builtin import FreeWorkerAutoScaler
from everai.image import Image, BasicAuth
from everai.resource_requests import ResourceRequests, CPUConstraints
from everai.placeholder import Placeholder
from image_builder import IMAGE

APP_NAME = '<your app name>'
VOLUME_NAME = 'models--runwayml--stable-diffusion-v1-5'
QUAY_IO_SECRET_NAME = 'your-quay-io-secret-name'
MODEL_NAME = 'runwayml/stable-diffusion-v1-5'
HUGGINGFACE_SECRET_NAME = 'your-huggingface-secret-name'
CONFIGMAP_NAME = 'sd15-configmap'

image = Image.from_registry(IMAGE, auth=BasicAuth(
        username=Placeholder(QUAY_IO_SECRET_NAME, 'username', kind='Secret'),
        password=Placeholder(QUAY_IO_SECRET_NAME, 'password', kind='Secret'),
    ))

app = App(
    APP_NAME,
    image=image,
    volume_requests=[
        VolumeRequest(name=VOLUME_NAME),
    ],
    secret_requests=[
        HUGGINGFACE_SECRET_NAME,
        QUAY_IO_SECRET_NAME
    ],
    configmap_requests=[CONFIGMAP_NAME],
    autoscaler=FreeWorkerAutoScaler(
        # keep running workers even no any requests, that make reaction immediately for new request
        min_workers=Placeholder(kind='ConfigMap', name=CONFIGMAP_NAME, key='min_workers'),
        # the maximum works setting, protect your application avoid to pay a lot of money
        # when an attack or sudden traffic
        max_workers=Placeholder(kind='ConfigMap', name=CONFIGMAP_NAME, key='max_workers'),
        # this factor controls autoscaler how to scale up your app
        min_free_workers=Placeholder(kind='ConfigMap', name=CONFIGMAP_NAME, key='min_free_workers'),
        # this factor controls autoscaler how to scale down your app
        max_idle_time=Placeholder(kind='ConfigMap', name=CONFIGMAP_NAME, key='max_idle_time'),
        # this factor controls autoscaler how many steps to scale up your app from queue
        scale_up_step=Placeholder(kind='ConfigMap', name=CONFIGMAP_NAME, key='scale_up_step'),
    ),
    resource_requests=ResourceRequests(
        cpu_num=2,
        memory_mb=20480,
        gpu_num=1,
        gpu_constraints=[
            "A100 40G"
        ],
        cpu_constraints=CPUConstraints(
            platforms=['amd64', 'arm64']
        ),
        cuda_version_constraints=">=12.4"
    ),
)
Load model
If your local environment does not have a model file, you can use the StableDiffusionPipeline.from_pretrained method to pass in MODEL_NAME and pull the model file from the Hugging Face official website. And by setting cache_dir, the model file will be cached in the private volume models--runwayml--stable-diffusion-v1-5.
You can get the local path of the volume models--runwayml--stable-diffusion-v1-5 through the everai volume get command. After entering the local path of the volume, you can see the model files that have been cached.
everai volume get models--runwayml--stable-diffusion-v1-5
<Volume: id: Xo6zoFc4986CrD7dYuNrwr, name: models--runwayml--stable-diffusion-v1-5, revision: 000001-12d, files: 76, size: 10.21 GiB>
path: /root/.cache/everai/volumes/Xo6zoFc4986CrD7dYuNrwr
When using everai app run to debug the sample code in the local environment, the value of is_prepare_mode is False, and the operation of pushing local files to the cloud will not be performed. If your local debugging environment has GPU resources(Nvidia GPU or GPU for MacOS devices with Metal programming framework), running everai app run will be successful.
After your code is debugged, execute the everai app prepare command. This command will execute all methods annotated by @app.prepare. At this time, the value of is_prepare_mode is True. In the sample code, the model files in the local volume models--runwayml--stable-diffusion-v1-5 will be pushed to the cloud when this command is executed.
from diffusers import StableDiffusionPipeline, StableDiffusionImg2ImgPipeline
import torch

txt2img_pipe = None
img2img_pipe = None

@app.prepare()
def prepare_model():
    volume = context.get_volume(VOLUME_NAME)
    assert volume is not None and volume.ready

    secret = context.get_secret(HUGGINGFACE_SECRET_NAME)
    assert secret is not None
    huggingface_token = secret.get('token-key-as-your-wish')

    model_dir = volume.path
    is_in_cloud = context.is_in_cloud

    global txt2img_pipe
    global img2img_pipe

    txt2img_pipe = StableDiffusionPipeline.from_pretrained(MODEL_NAME,
                                                        token=huggingface_token,
                                                        cache_dir=model_dir,
                                                        variant='fp16',
                                                        torch_dtype=torch.float16,
                                                        low_cpu_mem_usage=False,
                                                        local_files_only=is_in_cloud
                                                        )

    # The self.components property can be useful to run different pipelines with the same weights and configurations without reallocating additional memory.
    # If you just want to use img2img pipeline, you should use StableDiffusionImg2ImgPipeline.from_pretrained below.
    img2img_pipe = StableDiffusionImg2ImgPipeline(**txt2img_pipe.components)
    #img2img_pipe = StableDiffusionImg2ImgPipeline.from_pretrained(MODEL_NAME,
    #                                                            token=huggingface_token,
    #                                                            cache_dir=model_dir,
    #                                                            variant='fp16',
    #                                                            torch_dtype=torch.float16,
    #                                                            low_cpu_mem_usage=False,
    #                                                            local_files_only=is_in_cloud
    #                                                            )

    # only in prepare mode push volume
    # to save gpu time (redundant sha256 checks)
    if context.is_prepare_mode:
        context.volume_manager.push(VOLUME_NAME)
    else:
        if torch.cuda.is_available():
            txt2img_pipe.to("cuda")
            img2img_pipe.to("cuda")
        elif torch.backends.mps.is_available():
            mps_device = torch.device("mps")
            txt2img_pipe.to(mps_device)
            img2img_pipe.to(mps_device)
Generate inference service
Text generates image
Aftering loading Stable Diffusion 1.5 model, now you can write your Python code that uses flask to implement the inference online text-to-image service of AIGC(AI generated content).
import flask
from flask import Response

import io

# service entrypoint
# api service url looks https://everai.expvent.com/api/routes/v1/default/stable-diffusion-v1-5/txt2img
# for test local url is http://127.0.0.1:80/txt2img
@app.service.route('/txt2img', methods=['GET','POST'])
def txt2img():
    if flask.request.method == 'POST':
        data = flask.request.json
        prompt = data['prompt']
    else:
        prompt = flask.request.args["prompt"]

    pipe_out = txt2img_pipe(prompt)

    image_obj = pipe_out.images[0]

    byte_stream = io.BytesIO()
    image_obj.save(byte_stream, format="PNG")

    return Response(byte_stream.getvalue(), mimetype="image/png")
Image generates image
Now you can write your Python code that uses flask to implement the inference online image-to-image service of AIGC(AI generated content).
import PIL
from io import BytesIO

# service entrypoint
# api service url looks https://everai.expvent.com/api/routes/v1/default/stable-diffusion-v1-5/img2img
# for test local url is http://127.0.0.1/img2img
@app.service.route('/img2img', methods=['POST'])
def img2img():
    f = flask.request.files['file']
    img = f.read()

    prompt = flask.request.form['prompt']

    init_image = PIL.Image.open(BytesIO(img)).convert("RGB")
    init_image = init_image.resize((768, 512))

    pipe_out = img2img_pipe(prompt=prompt, image=init_image, strength=0.75, guidance_scale=7.5)

    image_obj = pipe_out.images[0]

    byte_stream = io.BytesIO()
    image_obj.save(byte_stream, format="JPEG")

    return Response(byte_stream.getvalue(), mimetype="image/jpg")
Build image
This step will build the container image, using two very simple files Dockerfile and image_builder.py.
There is an example code in image_builder.py.
In image_builder.py, you should set your image repo.
In this example, we choose to use quay.io as the public image registry to store application images. You can also use well-known image registry similar to quay.io, such as Docker Hub, GitHub Container Registry, Google Container Registry, etc. If you have a self-built image registry and the image can be accessed on the Internet, you can also use it.
from everai.image import Builder

IMAGE = 'quay.io/<username>/<repo>:<tag>'
The dependence of this step is docker and buildx installed on your machine. Otherwise we will have further prompts to help you install them.
docker login quay.io
docker buildx version
Then call the following command will compile the image and push them to your specified registry.
everai image build
Deploy image
The final step is to deploy your app to everai and keep it running.
everai app create
After running everai app list, you can see the result similar to the following. Note that CREATED_AT uses UTC time display.
If your app's status is DEPLOYED, and the number of ready worker containers is equal to the expected number of worker containers, which is 1/1, it means that your app is deployed successfully.
NAME                   NAMESPACE    STATUS    WORKERS    CREATED_AT
---------------------  -----------  --------  ---------  ------------------------
stable-diffusion-v1-5  default      DEPLOYED  1/1        2024-06-19T05:16:05+0000
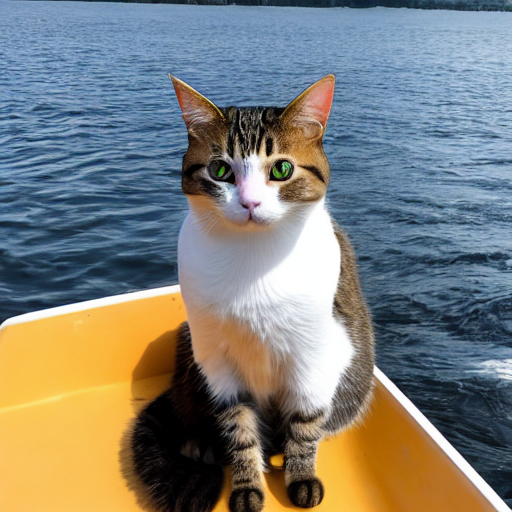
When your app is deployed, you can use curl to execute the following request to test your deployed text-to-image code, A picture generated by the Stable Diffusion 1.5 model will be downloaded in the current directory on the console.
curl -X POST -d '{"prompt": "a photo of a cat on the boat"}' -H 'Content-Type: application/json' -H'Authorization: Bearer <your_token>' -o test.png https://everai.expvent.com/api/routes/v1/<your namespace>/<your app name>/txt2img
Open the picture and you can see the following effect.
You also can use curl to execute the following request to test your deployed image-to-image code.
Before using curl to request, you need to download sketch-mountains-input.jpg to your local directory, execute curl in the directory of the console terminal, and a new image based on this original image of sketch-mountains-input.jpg and prompt will be generated by the large model Stable Diffusion 1.5.
curl -X POST -F 'file=@sketch-mountains-input.jpg' -F "prompt=A fantasy landscape, trending on artstation" -H'Authorization: Bearer <your_token>' -o test.jpg https://everai.expvent.com/api/routes/v1/<your namespace>/<your app name>/img2img
An example of the original image is shown below.

Open the new picture and you can see the following effect.